Metal siding can completely transform the look of your home. With the right approach, this project becomes surprisingly manageable for any dedicated weekend warrior.
It all starts with solid prep work. You will need to assess your existing surface, map out your panel placement, and create a proper moisture barrier. These quiet steps lay the groundwork for everything that follows.
From there, the real craft begins. Setting that first panel correctly takes patience. Each overlapping piece after that builds your wall with satisfying rhythm.
Corners and windows simply need thoughtful trimming. The finish comes naturally with careful sealing and a slow, attentive walk-through.
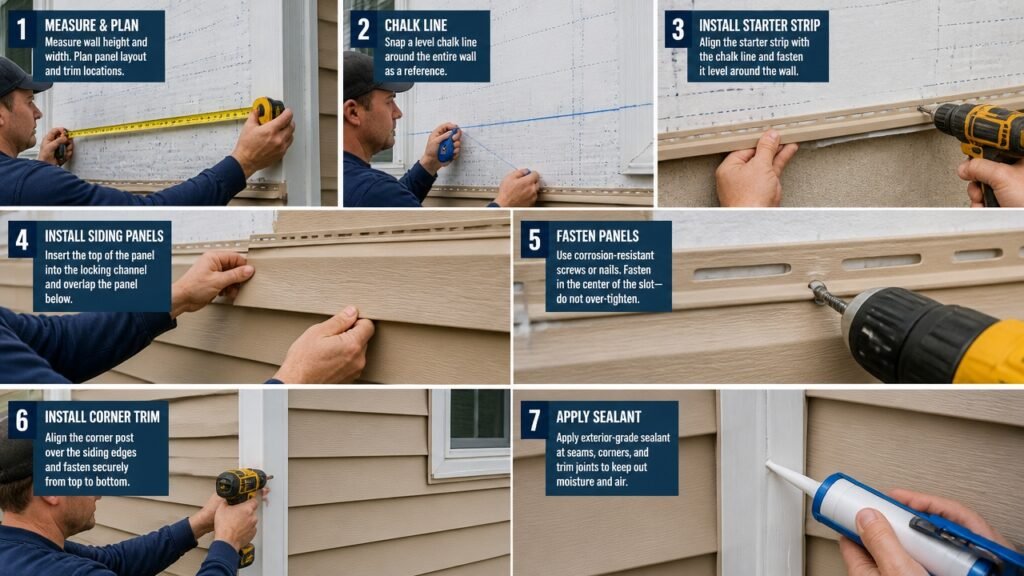
Step 1: Prep Your Substrate and Spot Damage Before You Start
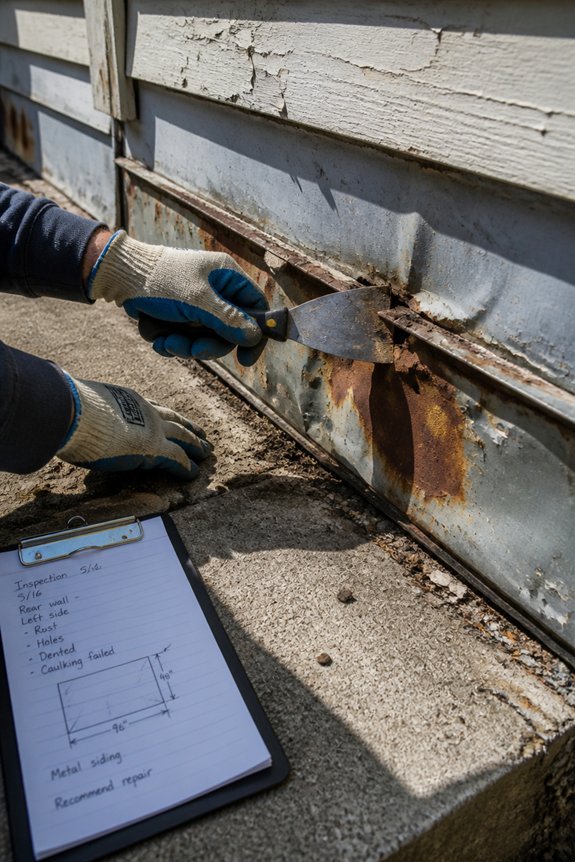
Preparing the substrate forms the foundation for a successful metal siding installation. Inspectors should examine the existing wall surface for rot, water damage, and structural deterioration. Common problem areas include damaged wood sheathing, compromised insulation, and rust on metal components.
Any soft spots, holes, or separation from framing need addressing before installation proceeds. Homeowners must replace rotted sections and repair gaps. The substrate should be level and sound before moving forward.
This preparation phase prevents future problems. Panel misalignment, moisture intrusion, and premature failure of the siding system can all be avoided with proper prep work.
Step 2: Plan Your Layout and Mark Where Each Panel Goes
A solid layout plan prevents costly mistakes during metal siding installation. Measure the building’s height and width first. Then calculate exactly how many panels you’ll need.
Start from the bottom corner and work your way up. Mark horizontal lines where each panel begins and ends. Use chalk lines, pencils, or string to create clear guides across the wall.
Account for windows, doors, and corners early in your planning. Stagger panel seams for better water drainage. This also improves structural integrity.
Double-check all measurements before making permanent marks. Proper layout ensures panels align correctly. It also reduces waste and gives your work a professional look.
Taking time for accurate planning now saves hours of adjustment work later.
Step 3: Lay Underlayment and Moisture Barriers for Protection
Once layout marks are complete, moisture protection comes first. Underlayment blocks water from reaching the wall structure behind your siding.
Common choices include synthetic wrap, felt paper, and asphalt-saturated materials. Each layer needs a six-inch overlap, starting at the top and working down. This keeps water from seeping upward into seams.
Windows, doors, and corners need extra care during installation. Secure everything with cap nails or staples so it stays put while you attach the panels.
Step 4: Position Your First Panel as a Reference Point
The first panel sets the baseline for everything that follows. Place it at the structure’s lowest point. Use a chalk line to keep it straight.
Check that the panel aligns with the underlayment. It should sit flush against the starter strip. Verify level and plumb now to avoid bigger problems later.
Shims help fix minor foundation inconsistencies. Secure the panel once it’s positioned correctly. This becomes your reference point for all remaining panels and their overlap patterns.
Step 5: Layer Your Remaining Panels With Proper Overlap
Each new panel overlaps the one below it by about one to one and a half inches. Check your manufacturer’s specs for the exact measurement.
This overlap keeps water out and maintains a tight seal. Always review the product instructions before you start, since requirements differ by metal siding type.
Keep the overlap distance steady across the whole wall. This ensures your wall looks even and works properly.
Measure at several points along each panel with a tape. This step confirms you’re placing each one accurately.
Drive fasteners through both overlapping layers. This secures the panels firmly without bending them or throwing them out of alignment.
Step 6: Trim and Fit Panels Around Openings and Corners
Measure from the panel edge to each opening. Mark your cut lines clearly on the metal sheets.
Use tin snips or a circular saw with a metal blade. Cut carefully around windows, doors, and vents.
Corner areas need J-channel trim pieces. These guide the panels and create clean, finished edges. Slide the metal panels into the channels. Space your fasteners evenly as you secure them.
Good fitting around openings keeps water out. It also gives your work a polished, professional look. Take your time with measurements and cuts. This careful attention makes all the difference in these detailed areas.
Step 7: Seal Joints and Inspect Your Complete Installation
Sealing joints prevents water infiltration and extends the lifespan of metal siding panels. Installers apply silicone caulk or polyurethane sealant to all seams, overlaps, and corners. Pay special attention around windows, doors, and trim edges.
After sealing, conduct a thorough inspection. Look for gaps, misalignments, or incomplete coverage. Check that screws are tight and properly spaced. Verify flashing sits correctly at roof lines and foundation areas. A final visual examination confirms uniform appearance with no visible defects or loose sections.
Frequently Asked Questions
What Tools and Equipment Do I Need to Install Metal Siding Panels?
Installers require a tape measure, level, drill, circular saw, metal shears, safety glasses, work gloves, roofing nails, sealant, and a ladder. Additional items include a caulking gun, crimping tool, and chalk line for precise panel alignment and weatherproofing.
How Long Does a Typical Metal Siding Installation Project Take?
A small residential home requires two to three days, while larger commercial projects span several weeks. Complexity, weather conditions, and crew size greatly influence timeline duration. Proper planning accelerates completion.
What Is the Cost Range for Metal Siding Materials and Labor?
Metal siding materials typically range from $3 to $12 per square foot, while professional labor costs $8 to $15 hourly. Total project expenses generally span $15,000 to $40,000 for average residential homes.
Can I Install Metal Siding Over Existing Siding or Brick?
Like layering paint on canvas, metal siding can be installed over existing materials. Yes, installation over brick or old siding is possible, though proper preparation—removing loose debris, ensuring a flat surface, and adding furring strips—remains essential for longevity.
What Warranty and Maintenance Requirements Come With Metal Siding?
Metal siding typically carries warranties ranging from 20 to 40 years, covering defects and weathering. Maintenance involves annual inspections, cleaning debris, checking fasteners, and repainting every 10-15 years to prevent rust and corrosion.
Conclusion
Completing metal siding installation requires attention to each step, from substrate prep through final inspection. Homeowners who follow this telegraph-era approach to modern materials achieve durable, weatherproof results. Proper overlap, sealed joints, and trimmed openings prevent water damage and drafts. Success depends on careful planning, precise measurements, and quality materials. Taking time during installation prevents costly repairs later, making professional-looking siding achievable for diligent property owners.